Defining Uplink Types
You define uplink types in the Sites & Networks page.
An uplink type is a name for similar functioning uplinks. On the SCC, uplink types can be used across multiple sites and path selection rules can be created using these names. The name must be unique at a site (but it can be same across different sites) so that the system can detect which path selection rule uses which uplinks. Because path selection rules are global on the SCC, you are restricted to 8 uplink types.
Ra Beauty Retouch Panel V33 Cho Photoshop: Cc C Work _verified_
To ensure the panel works correctly in Photoshop CC, follow these steps:
Quickly toggles visibility to help you see where the "blotchiness" is hiding. 2. Specialized Dodge & Burn ra beauty retouch panel v33 cho photoshop cc c work
The is the ultimate "assistant" for photographers. It doesn't do the work for you—you still need an artistic eye—but it removes the tedious "grunt work" of setting up layers, allowing you to focus on the art of the edit. To ensure the panel works correctly in Photoshop
Note: On the SteelHead, this field is called the Uplink Name, on the SCC it is the Uplink Type. Riverbed recommends using the same name for an uplink in all sites connecting to the same network.
To define an uplink type
1. Choose Manage > Topology: Sites & Networks to display the Sites & Networks page.
2. Under Uplink Types, click the > to expand the page.
3. Click the + to display the New Uplink Type dialog box.
Figure: New Uplink Types
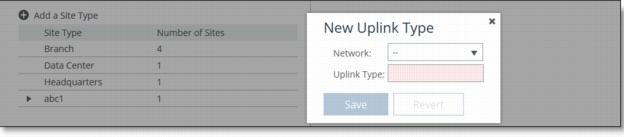
4. Complete the configuration as described in this table.
To ensure the panel works correctly in Photoshop CC, follow these steps:
Quickly toggles visibility to help you see where the "blotchiness" is hiding. 2. Specialized Dodge & Burn
The is the ultimate "assistant" for photographers. It doesn't do the work for you—you still need an artistic eye—but it removes the tedious "grunt work" of setting up layers, allowing you to focus on the art of the edit.
5. Click Save to save your settings.